Guide to fix NVIDIA control panel missing issue easily.

In any epidemical situation or free time, people can rely on indoor games, 3d rendering, and videos, especially while encoding the high-resolution videos to enjoy their time. Computer games are one of the best ways to utilize time with great visual experience.
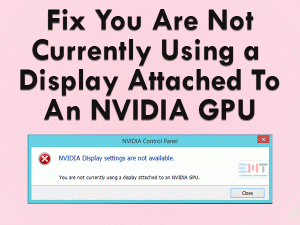
Well, visual experience entirely depends on the graphics of your computer like NVIDIA. Many users are facing issues related to the NVIDIA control panel while using their computer. This control panel enables a user to handle GPU ad MCP hardware-related settings. NVIDIA control panel is missing, the issue has happened with many users.
Well, no need to worry, as various solutions can resolve the issue NVIDIA control panel missing option. Please go through the entire article by following each method one by one, in case first doesn’t work for you. These methods are capable to resolve any issue related to the NVIDIA driver.
NVIDIA Control Panel Is Missing: Problem Overview
Many users are facing issues like NVIDIA control panel access denied. This limits their desire of changing the hardware-related settings in their GPU graphics card to gain high-level experience. There could be various other reasons as well behind the NVIDIA control panel client folder missing.
Like outdated drivers which can cause compatibility error, outdated NVIDIA driver, wrong or missing registry entries, Graphics card issues, and corrupted NVIDIA, driver. The methods mentioned in this blog is applicable to all the issues related to the NVIDIA driver.
NVIDIA Control Panel Is Missing: Related & Common Problems
Basic Troubleshooting Steps
- Performing Power Cycle – In any case, this simple trick resolves the issue. Simply unplug your computer completely from everywhere. Disconnect all the chords and external hardware’s from your computer. After a few minutes connect all the wires and restart to check if the issue persists. Sometimes, the issue is with the sensor which gets rebooted after complete power off.
- Update your system – It is very important to check whether windows are up to date or not. Sometimes while downloading updates for windows, it includes some important updates to enhance the performance of driers like NVIDIA.
- click on the start menu and go to the settings.
- Look for “Update and security” in the popped up screen.

- Choose “Windows update” and click “Check for updates” toggle.

- Let the updates get downloaded and installed.
- As installation is finished, just restart your system.
Now check if the issue with NVIDIA driver is resolved or not. This one step can resolve any issue if the problem is related to compatibility.
- Delete temporary fusing Disk Cleanup
- Type “Disk Cleanup” in the search bar of your windows start menu.

- look for the drive need to be cleaned up and select it then press OK.
- select “Cleanup system files”.
- Now mark the boxes, which you want to remove and then press ”OK” toggle to start the process.

If you want to perform a full cleanup, select all and press “OK”. This procedure will take some time, let it complete. After this try to download the NVIDIA Control panel and install it without any error.
Step to Fix NVIDIA Control Panel Is Missing
[ps2id id=’Method-1-Restart-the-NVIDIA-software’ target=”/]
Method-1
Restart the NVIDIA software
Sometimes rebooting the NVIDIA software can fix the whole issue. So do follow the following steps to perform these.
-
- Tap on Windows key with alphabet “R” to open the RUN window.

- Now write “services.msc” in the RUN dialogue box and press OK toggle. This will open the “Task Manager” window.

- A list of services will pop up on your screen.
- Look for the NVIDIA services and select any one of them at first.
- Now right-click on it and select “Properties”.

- Under the “General” section look for the option “Startup type” and set it “Automatic” if it’s not.
- Now under “Service status”, tap on the “Stop” toggle.
- Tap on Windows key with alphabet “R” to open the RUN window.
- After waiting for a few minutes, click on “Start” toggle and confirm the popped up box.
- Now check whether the issue related to the NVIDIA control panel is gone or not.
[xyz-ihs snippet=”Best-Laptop-Buying-Guide”]
[ps2id id=’Method-2-Check-on-if-NVIDIA-Control-Panel-is-hidden’ target=”/]
Method-2
Check on if NVIDIA Control Panel is hidden
Sometimes accidently user hides it or it can also happen while installation procedure. Do follow following steps to resolve it.
- Type “Control” in the computer search bar, now looks for “NVIDIA Control Panel” in the search list appeared and clicks on it to open.

- Now tap on the “Desktop” option available in the upper bar and mark the box “Add Desktop Context Menu”.

After this Do check whether the issue is resolved or not. In case it is not then look for the next method.
[ps2id id=’Method-3-Update-NVIDIA-Drivers’ target=”/]
Method-3
Update NVIDIA Drivers
An outdated NVIDIA graphic Driver can be the reason behind many issues you are facing like “NVIDIA control panel is missing”. Update your NVIDIA drive using following method.
- Look for “Device Manager” in the windows search bar and click on it.

- Navigate and choose “Display Adapters” and tap on it to expand.
- Look for the NVIDIA graphics driver and select the Update Driver option.

- Now go for the option “Search automatically for updated driver software”.

- After some time, it will display if any update is available. In case of updates are available follow the on-screen instructions and update it.
In case there is the update is not available or even after updating, the issue is not resolved then try the next method.
[ps2id id=’Method-4-Ultimate-Method-Reinstall-the-NVIDIA-Driver’ target=”/]
Method-4
Ultimate Method – Reinstall the NVIDIA Driver
This procedure is a little long but it is the ultimate one. First thing you need to do is to start your computer in safe mode. Follow the following steps to apply this whole procedure successfully.
- press the windows key + latter R together.
- type “msconfig” in the run box.

- now click on the boot tab from top of the option.
- under the boot option check the box safe boot. and under the safe mode check the network.

- click on ok and restart you computer.
Once you entered in safe mode, look for the NVIDIA file folder to delete it in order to uninstall your NVIDIA driver. Do follow the following steps.
- Look for the option “This PC” and tap on “Local disk C” then go to the “Program Files” folder.
- Now look for the folder named “NVIDIA Corporation“. Now, Right-click and select the “Delete” option.
- After this, tap on the Windows key with alphabet “R” to open the RUN window.
- Now write “devmgmt.msc” in the RUN dialogue box and press OK toggle. This will open the “Device manager window”.

- Look for the “Display Adapters” option and click on it.
- Now right-click on the “NVIDIA” adapter from the list and select “Uninstall”.

- You will get a pop up “OK”. Simply click on it to make the un-installation successful.
Once it’s over, start your PC in normal mode. Download the latest version of the NVIDIA driver from the official website.
- Tap on the downloaded setup file to run the setup in order to start the installation process.
- Choose option “Custom installation” and mark all the boxes under this including a checkbox “Perform clean install”.
- Now restart the computer to check whether the NVIDIA Control panel is now visible or not.
In case the problem is still persisting, repeat the whole procedure and go for an older version of NVIDIA Driver. Sometimes it resolves the issues.
[xyz-ihs snippet=”laptop-Accessories-Buying-Guide”]
[ps2id id=’Method-5-Launch-NVIDIA-driver-manually’ target=”/]
Method-5
Launch NVIDIA driver manually
This is another solution. Try to launch your NVIDIA driver manually. Follow the steps given below to do it.
- Search “this PC” in the search box and open it same from search result.

- Look for “Local disk C” then go to the “Program Files” folder.
- Now look for the folder named “NVIDIA Corporation” and open by clicking on it.

- Now look for the folder “Control Panel Client” and open it.
- Look for “nvcplui.exe” then right-click on it and choose “Run as Administrator” option.

After doing this, the issue should get resolved. Do check it is resolved or not.
[ps2id id=’Method-6-Don-over-clock-your-gpu’ target=”/]
Method-6
Don’t over-clock your GPU
Over-clocking has its own advantage but it has been noticed that after turning off this feature in GPU NVIDIA control panel issue got resolved. So don’t over-clock your computer as it can harm the application while running. Please disable the over-clock option on your computer. In case this is the reason, the issue will get resolved.
Sometimes users use third party applications for such things. Try to avoid it because this may not be compatible with some applications which will cause you problems while using. However, NVIDIA has its own over-clocking software available. It would be better if you not try any third-party software.
FAQs: NVIDIA control panel missing
-
1. How do I fix NVIDIA control panel missing options?
To fix this issue you need to make sure your drivers are up to date. Do follow the Advanced troubleshooting steps one by one. Surely one of them will work for you. This issue can be because of incompatibility caused due to an outdated driver. Make sure all the drivers are up to date. In case still unresolved, just try uninstalling and reinstalling the NVIDIA control panel by following Method 4 under Advance troubleshooting steps of this blog.
-
2. Why is my NVIDIA control panel missing?
This can be because of an outdated version of your NVIDIA. Make sure you have updated your drivers. If not then follow method 3 under advanced troubleshooting of this blog. It will fix the missing NVIDIA control panel on your computer.
-
3. How do I fix NVIDIA Control Panel not appearing or not showing?
Sometimes while installation, it happens we accidentally hide it. You can fix it by simply following the steps provided in a Method 2 under Advance troubleshooting steps of this blog.
-
4. What is the latest version of the NVIDIA control panel?
The latest version of the software NVIDIA Control Panel is 6.14.12.5741 of approx 122 MB size under NVIDIA official developer’s site. It is supported by Windows 7/8/8.1/10 versions. It is advisable to windows 10 users to download it from Microsoft store.
-
5. How to Download NVIDIA Control Panel for Windows 10?
It would be better to download it from Microsoft store in windows 10. Search “NVIDIA control panel” and download it. In this way, it can be more productive for windows 10 users
-
6. What is NVIDIA G-sync?
G-synch ensures the smoothness of the image on your computer. Proper synchronization is required to have an unripe quality visual. Even when the refresh rate gets affected, visuals start to stutter. G-sync balances the refresh rates as well as it smoothes the visuals. It depends on does your monitor supports Adaptive sync or not. In many cases G-synch option is not there, this can be because of the unsupportive monitor or other hardware.
-
FAQ:7. G-sync is not working in windows 10, what to do?
For gamers G-sync is an essential feature, this can be resolved by changing the V sync settings. At first update, your drivers and then apply these changes. This may be able to resolve the issue you are facing with G-sync.
- Go for the NVIDIA control panel in your taskbar. Right-click on it and choose the NVIDIA Control Panel.
- Look for the “Manage 3D settings” option to open it.
- Now go for the “Global setting” tab section, a list will be there.
- Look for the “Vertical sync” option in the list and turn it “on”. And then click to “Apply” toggle to save the changes.
-
8. NVIDIA Graphics card not detected in Windows 10, what to do?
Sometimes graphics card does not appear in Windows 10. Also sometimes the Graphic card doesn’t get detected in the Device Manager Section. The reason can be an outdated driver because this creates compatibility issues. Also, maybe the connection is incorrect or it is not enabled in your BIOS. You need to enable it by entering in your computers BIOS in safe mode.
- Restart your computer and press F2 or Del key continuously to get access to BIOS.
- Once you entered in BIOS, just look for “dGPU” option.
- Now if it is not enabled then set it to “Enable” under the Chipset à”dGPU Configuration” section.
After this, the issue generally gets resolved. Also, you should update your BIOS if it is outdated.
Tips to Avoid Error related to NVIDIA control Panel
Contact Officials
In case nothing worked out for you, maybe it has some deep technical fault. Worry not, contact NVIDIA customer support. You can set a live chat with them or call, as per your comfort. The company will verify your details initially. Then they will surely resolve the issue you are facing. Do contact official supports in order to get assistance.
Final Words: Conclusion
The methods mentioned here are tested. Do follow all the steps properly to ensure productivity. In case you face any problem while using any step, do mention in the comment section below, we will reach to you soon. When your problem get resolved, please mention the step that worked for you in the comment section below with a feedback message. Your feedback encourages us in a positive way.